Showing posts with label My Projects. Show all posts

Monday, November 19, 2012

December Daily 2012 Ideas and Thoughts

What is December Daily? It is a project started by Ali Edwards that is basically a way to document the Christmas/Holiday season.
Why do it? It's easy to forget the little details that from the holidays since they rush by so fast. Why not capture them and celebrate what makes them special to you?
What if I'm already doing Project Life? Isn't this the same thing?
Not a problem, Project Life is more of a simplified snapshot. December Daily is more of an in depth close up of your holidays.
How do I get started?
*Buy, find, or make an album (after deciding what size you want) then create base pages. 
This could be as simple as sticking cardstock on the page. 
*Buy/gather embellishments. You can go with a theme or coordinating color palette or have a different one everyday. 
*Create Date labels. This could be as elaborate or simple as you want. You need to decide what days you want to document, Ali does the 1st through the 25th. I think it's neat to do the whole month so you can include New Years Eve. Last year I used 2 different stamps. 

It's not necessary to do all this pre-planning but I promise you it is so much easier to keep up with when you do. I suggest to at least do the 1st week. I also suggest buying a notepad/notebook to write down details, ideas, photos you want to use to keep track of your days. Carry it around with you so when inspiration strikes you can jot it down. If you travel or get behind this is an excellent resource.

If you think your life is too boring it's NOT. I've been taking an online class all year that has really taught me that my life is filled with stories, even me a person with no children or spouse. Every life has value and interest. Find Ali's ideas here: http://aliedwards.com/2011/11/december-daily-2011-25-ideas-and-story-inspirations.html

Another spin on this daily December project is Shimelle Laine's (one of the garden girls at Two Peas in a bucket)  Journal Your Christmas project. It is similiar to DD because it helps you document the holidays day by day. However Shimelle's take is through an online class (including forums) that really guides you with daily prompts sent to your email. The prompts include journaling ideas, photo ideas/tips and even downloads. One of the neatest things is once you pay the first year ($35 last year) you are automatically enrolled each additional year for free. About $1 of each enrollment also goes to a charity fund she supports. Find more info here: http://www.shimelle.com/paper/1284/journal-your-christmas-2011-online-scrapbooking-class/ She should be updating it soon with the 2012 info. I highly recommend it because she's a fabulous teacher.

This year I'll be doing a combination of the 2. I love the guidance that Shimelle gives but this year I'd like to try to switch things up which is why I'm calling mine December Daily this time. I'll be doing my own ideas for much of the month but there will be certain days that I will refer to JYC emails. That's the lovely thing about this you can do whatever, however you want! Check  out a couple pages from mine last year!
My cover from last year
You don't need to have a photo on every page
An awesome printable from Shimelle
last year


Pictures don't have to be perfect
Don't be scared to document the "bad parts"


Final Tips
1. Don't be scared of this project, don't feel pressured to make it perfect or to "keep up"
2. Include memoribilia like your Christmas card, a napkin, a Starbucks cofee label or ripped out advertisement you like
3. Have other family members contribute
4. Don't forget to get in the pictures
5. Have fun

Friday, October 19, 2012

Double Slider Stick Pin Box

Hi there, welcome to my little corner of the web! Thank you for joining us in this Halloween blog hop, you should be coming from Liz's blog. You can also start from the beginning with Yolanda.

A few weeks ago I participated in a stick pin swap and wanted to find a fun holder for them. I came across an adorable box on youtube from sscrafter1 that you can find here: Double Slider Box

I received many compliments and decided to document how I did it but make sure to watch the video, she makes it very clear and I don't know about you but I'm a visual person.
I also went ahead and made some printable instructions that go more into detail. Download them here:
Box Instruction Pictures This has a full page of photos
Box instructions
 

In the end you will come out with this!

Measurements:
4" tall, 3" wide, 3/4" deep

Box body -4x10 3/4 patterned cardstock (can be double sided but not required, the middle panel will be the front of the box, panel with tab will be the back)
Inserts- 2 of these-2 3/4 x 3 3/4 cardstock (1 will be seen from top, 1 from bottom, decorate before assembly)
Lid-3x3
Slider-You will need a 1 inch wide strip cut from a plastic shopping bag about 8-9 inches
Additional supplies: double sided tape, liquid glue, hot glue gun, glue sticks, scoring tool,
embellishments , foam or makeup sponge 


Instructions:
1. Score the body at 3", 3 3/4", 6 3/4", 7 1/2", 10 1/2", this will form 3 panels that make up the box.
2.Wrap plastic strip around the panel without the tab lenghwise so it runs from top to bottom, forming a loop, pull tight and use doublesided tape to adhere to each other and not the box.
3. Add at least 2 additional strips of tape to joint and right above. Adhere the 1st insert to this. Add foam or cut up makeup sponge with hot glue to bottom of panel to hold your stick pins.
4. Pull insert to top edge, turn panels around so you are now working on the backside.
5. Add double sided tape to plastic strip and adhere 2nd insert facedown, aligning with bottom edge.
6. Form box, add liquid glue to tab, glue to box so that it rests below insert.


This picture is missing inserts but you can see the tab you will be adding the glue to. Also you can see the lid.
7. Score lid at 1/2", 1 1/4", fold and add glue to bottom and add to box so that lid will close correctly.
8. I decorated with a die cut on front that was glued on halfways so that the lid cut tuck in right behind. In the video she used a velcro dot to close.
8. Your slider should work so that when you pull out the insert on top, the insert will peek out of the bottom at the same time.
Tada! All done.

I embellished by 
-rounding my corners of my lid and added a purple bow
-adding a Close to my Heart stamp spooky sentiment on the lower panel. I also added some stickles in Firefly and bling from my stash.
-edge punched the upper panel along with stapling a strip of orange ribbon so that it's easier to pull
-die cut a cat and fence with bird on top with my Cricut using the Chic n Scary cartridge, added purple bling from stash, stamped bats from Close to my Heart set and then fussy cut, Black Diamond stickles
-punched circle to silhouette cat

Now for some fun! Blog Candy!

Just leave a comment with a way to contact you and I will be handing out a little Halloween kit and also the box I made with the stick pins! Deadline is 9pm Pacific time Sunday, winner announced Monday morning.
GIVEAWAY CLOSED (There were 26 people but 28 comments so I went with the 26 people)
The winner is Tracie!

Your next stop is Wanda's Blog


Don't forget to visit the rest of the blog hop:
1. Yolonda  http://craftyscentiments.blogspot.com/
2. Terri  http://scrappinwiththebug.blogspot.com/
3. Brenda http://happyscrapper64.blogspot.com
4.  Liz   http://lizziesworldofcrafting.blogspot.com
5. Sofia  http://glitternglow.blogspot.com <<<<<<You are here!
6. Wanda  http://greenapplescrapper.blogspot.com/
7.  Becka  http://www.creationswithbecka.blogspot.com/
8.  Tammy  http://www.scrapcavecreations.com/
9. Michele  http://www.michelegreen.com/
10. Betsy   http://betsymcreates.blogspot.com/
11. Tracie  http://www.thecraftytouch.blogspot.com/
12.  Sherry   http://macybella.blogspot.com/
13.  Terri  http://tdycreativegal.blogspot.com/
14.  Amy  www.clearlystamping.blogspot.com

Saturday, September 22, 2012

Cricut Circle Crop Checklist

I just noticed that this list was messed up. So once again I have reuploaded it. Please link people back to this post instead of giving them a copy, it took me awhile to figure this out. Yadda yadda yadda. Oh and there is one line with the wrong font but it's 1AM so I'm letting it slide this time.

Thursday, September 6, 2012

Pf Changs LO

So here is a LO I did from a trip I took back in May which I so need to write about. It was the Teresa Collins Inspired Journey Event in Southern California.
Made with a kit from Studio Calico, can't remember which one but I think either the December or January one.

Thursday, July 12, 2012

Recipe Card Swap

Okay late last year a Cricut Circle member posted an ambitious project: a yearlong recipe card swap. She took signups for 10 people to submit 6x6 recipe pages every few months. She would sort and mail them back to us. I signed up as I love collecting recipes and thought it would be fun.

Well we have done 3 recipes so far and it has exceeded my expectations. The ladies are beyond nice and the cards are adorable. I haven't put them into an album yet as I was deciding if I wanted 1 big one or a couple of smaller ones.

Here are my 3 contributions so far:
Appetizer: BBQ bacon spread
Carts used: Block party, Country Life, All Mixed Up, From my Kitchen
Other supplies: stickles, Die Cuts with a view patterened paper, Mister Hueys mist
black cardstock, picnic patterned paper from stash, red pen, red ink

Salad: Jalapeno chicken salad
Carts used: County Life, Old West
Other supplies: Cuttlebug circles folder, October Afternoon and My Minds Eye patterened paper,
Uniball white pen, black pen, Jenni Bowlin tag punch, stickles, clip art, green pearl bling


Main: Deep Pit Beef (pull out recipe card attached to back with washi tape and vellum)
Carts Used: Stand and Deliver, Forever Young, Old West, Block Party, Gypsy Wanderings
Other supplies: Stickles, red glitter ribbon, circle punch, black and blue cardstock, star patterened paper from stash, washi tape from Smashbook

All fonts used downloaded from Lettering Delights, Dafont.com or else preinstalled on computer (PC).

Sunday, April 22, 2012

Resort Life LO

Here's a layout I did using a Studio Calico kit. I am currently obsessed with them. This LO features paper from Crate Paper, SC wood veneer alphas, Amy Tangerine sticker border and some buttons and glitter brads from my stash. The pics are from a trip to a resort in the Phillipines! The giant flower was in my stash for years so I was happy to finally use it but it could also be cut out using a die cut machine and just ruffling the edges a bit. I love this LO because it makes me excited for summer.

Thursday, January 12, 2012

Recipe Card 4

Here's my final recipe card I created for our swap last month. I just noticed there's a typo! (Insert profanity here)
Carts used:
Forever Young
Country Life
George
Jolly Holidays
Other supplies: Cardstock from stash, red stickles, red rick rack ribbon, TH distress ink, puffy cream applique paint, digital supplies (font and border) from Lettering Delights


Thursday, December 22, 2011

Recipe Swap Page Raspberry Cake Bars

I participated in a Recipe Page Swap last month. Sadly the organizer had a family emergency so I don't have the whole book completed but thought I'd share a page here. There were 4 groups (6x6s and 8x8s) and I participated in all of them! I made 81 pages in 2 months which kind of shocked myself but I was motivated. I was going to give 2 of these away as gifts but that will have to wait till next year, oh well. I already shared 2 on the Cricut circle messageboards but thought I'd share 1 more today.
I used the Christmas, and From My Kitchen cartridges which I totally bought just for this swap.
Papers are from my stash and Die Cuts with a View Luxury collection.
Bling, ribbon are from my stash and I made the recipe card using digital files from Cosmo Cricket which I bought from Jessica Sprague. The title font is called Buttercream which I purchased from Lettering delights.

Wednesday, December 7, 2011

Tim Holtz 12 tags Day 2

Here is my version of Day 2. I love the deer and woodsy feeling.
Carts used
Christmas solutions for deer and wreath
paper tape from 7 gypsies
frost spray
wooden buttons, star bling, crinkle ribbon from stash
gear from TH collection

In the light, to show shimmer

Tim Holtz 12 tags Day 1

I decided to take part (partially) in Tim Holtz's 12 tags of Christmas blog event. It is where he creates 1 tag a day and shares it with everyone on his blog. I actually had never heard of it until a friend of mine mentioned it a couple of months ago. I like it because even if you don't have his products you can still adapt it to make your own version. For example I basically only have his inks, no stamps or dies. Instead I will be using my Cricut machine.
This is my version of Day 1 which I absolutely loved!
carts used:
Blackletter font from my Gypsy device
Christmas solutions cartridge for the holly leaves and greenery.
Art Philosophy  for the "pinecones"
Tags, Bags Boxes for the actual tag using TH distress cardstock
pearls, white paint, acrylic drops, glitter, white crinkle ribbon from my stash
Snowflake cuttlebug embossing folder

Love the sparkle!


Friday, October 14, 2011

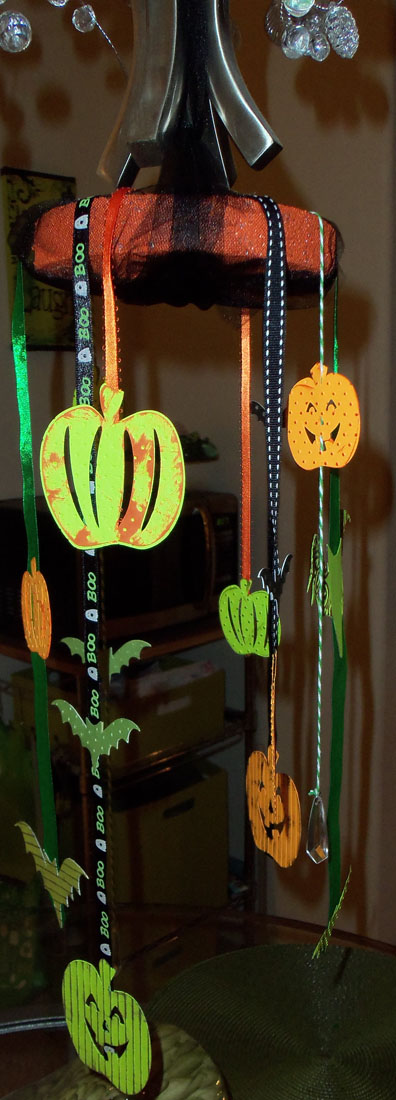
Halloween Mobile

If you remember I had a couple of styrofoam circles that were just waiting for me to make something with them. I have been trying to add on a couple of Halloween decorations to the house and thought a cute mobile would be a fun addition. It is hanging from our chandelier over our dining table. The simple instructions are:
1. Paint circle (I used orange)
2. cover with black tulle (I liked the messier look)
3. hot glue gun strips of ribbon so that they hang over the side
4. glue various shapes onto ribbon, make sure you do 2 sides that will fit together with the ribbon in the middle like a sandwich and make sure they will be spread evenly around
5. use long piece of black tulle as the hanger and tie onto wherever you'd like


Carts used: Gypsy wanderings, Chic and Scary
Embossing folders: straight lines, tiny dots, typewriter
Orange and Green cardstock from stash
Distress Ink: Peeled Paint, Walnut Stain, Ripe Persimmon (limited fall collection)
various ribbon from stash
styrofoam circle
Martha Stewart orange paint
black tulle
glossy accents
crystals

Monday, October 3, 2011

I won a contest!


Check out her blog for fantastic and adorable ideas!

She recently had a 2nd chance contest for people who entered the HSN Cricut banner contest and I won!http://icameisawicreated.blogspot.com/2011/10/second-chance-banner-contest-winner.html Here's a reminder about the "winning" banner:

Halloween/Autumn Pin Swap

So I went on a wonderful weekend of crafting with some of my Cricut Circle friends last week and we did a pin swap. I did mine entirely from paper but it was pretty stable since it's about 4 layers thick plus I coated it with Tattered Angels glimmer glaze which is like a sealer. I used the chandelier glaze color which is a fabulous clear coat with rainbow glittery goodness. I highly reccommend it!
I gave people the choice of either Halloween or Autumn themes since not everyone celebrates Hallween. The pumpkins are from the digital cart Smiley Cards I got from buying my Gypsy last year. I also used the leaf from Gypsy Wanderings and flower and scalloped circle from Forever Young.
The main difference between the 2 are the colors and I added on some teeth and stickles to the Halloween one. I also used a cuttlebug striped folder to emboss the pumpkins and of course inked everything.
Oh and I also had to share the hotel I stayed at, the SouthPoint Hotel in Las Vegas. It was great, just south of the strip, and with plenty to do for all ages. They had a theater, bowling alley, spa and multiple places to grab some food. The best part of the place was that everything was super easy to find and layed out in a central pattern around the casino area. My room was also great with plenty of space, although I was facing a wall!

Monday, September 19, 2011

HSN Banner Contest Entry #2

Here is my 2nd entry into the banner contest for the Cricut Anniversary. I'm not 100% crazy about it but it has slightly grown on me. I like the boldness of it! I used the cuttlebug, black tulle, red stickles, red bling, die cuts with a view paper from All Dressed Up, Gypsy Wanderings cart and the Art Philosophy cartridge available only through a Close to my Heart consultant. I am more hopeful about my 1st entry but I'm glad to have finished this one.


Thursday, September 8, 2011

Cricut Circle Crop Checklist

I'm on a roll! Here is a cuter checklist made specifically for Cricut Circle Crops but could be adapted to any crop you attend. Once again please direct people back here instead of sharing the file directly. Thanks!

Wednesday, September 7, 2011

Scrapbook Crop Checklist

I looked EVERYWHERE  for a cute printable checklist for me. I couldn't find anything, maybe I'm just not looking hard enough. I went ahead and made one in Word. I used a font from Lettering delights but it wouldn't upload right on box.net so I went ahead and used a basic font in Word. I'd love it if you directed people back here instead of just giving them the file. Thanks and I'll be working on a cuter one.Of course I don't take all these things but thought I'd add them all in anyway for others who like to take all these things. You can just cross out those items. I also included a couple of extra boxes to check off for your specific items. I love checklists, they make me feel like I'm accomplishing something!

Monday, August 29, 2011

Halloween Banner with Cricut

Provo Craft is having a banner contest for their HSN day at the end of the month. You can enter 2 different banners which is what I wanted to do and I had the idea of making a small one. I thought about it and figured that a Halloween one would be cute since I just received my Teresa Collins Scary and Chic cartridge. It's adorable by the way! I think my favorite thing about the banner is the size and the fact that I used only cardstock.
Here is my 1st submission using Scary and Chic and the Wild Card cartridges. I also used stickles, Martha Stewart glitter, cuttlebug swirls embossing folder, Shabby Shutters Distress Ink, twine, and a few silver pearl accents.


Saturday, July 23, 2011

Christmas in July challenge #3 3D scene

For our next challenge we were to make something outside our comfort zone. I went ahead and made a 3D scene. I'm going to put either a photo, stamped image or quote inside the door. Oh yeah the door opens! I was thinking that because of it's circular shape it would look good with a battery operated tealight behind the door.
Recipe:
Christmas cart, door dark brown paper,
christmas cart, door blackout kraft paper, covered in green, top cut off
christmas door, door shift kraft paper, inked with distress ink walnut
all door pieces at 5.65"
christmas wreath green cardstock, 1.52", inked with walnut, added red ribbon, red & clear bling
snowflake paper die cuts with a view cut out with MS circle cutter, cut in half
base is styrofoam circle, I painted and distressed it, added glitter, flock, flakes (doesn't really show up in the pic)
I also added a backing to the door to make it stand up, I basically just cut a strip of paper and made a stand

Christmas In July Scrapbook Layout

I'm involved in an online challenge where we have to create various projects. Here is a LO for the Christmas holiday. I can't believe that people are already talking about it!

I used the Jolly Holidays cricut cartridge for the mittens and bird and the gypsy wanderings cart for the small border of presents. My paper was Die Cuts with a View Christmas stack from last year and also a sheet of provocraft christmas paper pad. The rest was cardstock and bling from stash. I embossed the bird and mittens with my polka dot cuttlebug folder. I also added white flock on the mittens. They are free hanging from a button with some red bakers twine. I attached the other bakers twine with my tiny attacher (love that thing).

Wednesday, July 13, 2011

California Cricut Circle Pennant Contest

So the Cricut Circle is having a Pennant contest for everyone to celebrate their CHA event. They will string up all of the entries together and yes I sent mine today Priority mail. I'm nervous it will get jacked up in the mailing process though and sad that I didn't take more pictures than these. It's alot cuter in person as there is sparkle everywhere. I was in a hurry to mail it off though and  the light was not working out. Oh well.

I really worked alot on this thing. I of course used my cricut bug (carts used gypsy wanderings, smiley cards, pop neighborhood, gypsy font, George, Old West) The Birthday bash cart was used as the base for the pennant which a girl named Heidi was so kind to cut for me!
I used alot of stickles, glimmermist on the background, along with rock candy crackle finish on the water. I cut a border from gypsy wanderings in half and flocked it with white as the waves. I have a limited amount of carts so I had to improvise on my design like the sailboat is part of a border that I cut out and embossed. I chalked the cheeks on my sun and hand drew the windows on the skyscrapers, then added glossy accents on them. I also added glossy accents on my crab after hand drawing his face.
I used a plank from the Old West cart but then cut them in half an added lines with my white pen (an idea inspired by Monique Griffith's adorable Stampede page kit).
I glimmer glazed the car with chandelier and used a transparent sheet for the window. I embossed the trees with my cuttlebug and used rock candy stickles on the mountain tops. Lastly I used a product called mud puddles on my beach part for my sand. It is a fabulous if messy, 3D product that similulates various tones of sand.

I was inspired by my state of California since it has everything you could think of from snowy mountains to sunny beaches. Where I live though it's lots of country land so I wanted to express that with alot of green (paper from Die cuts with a View)

Thanks for reading this long post!